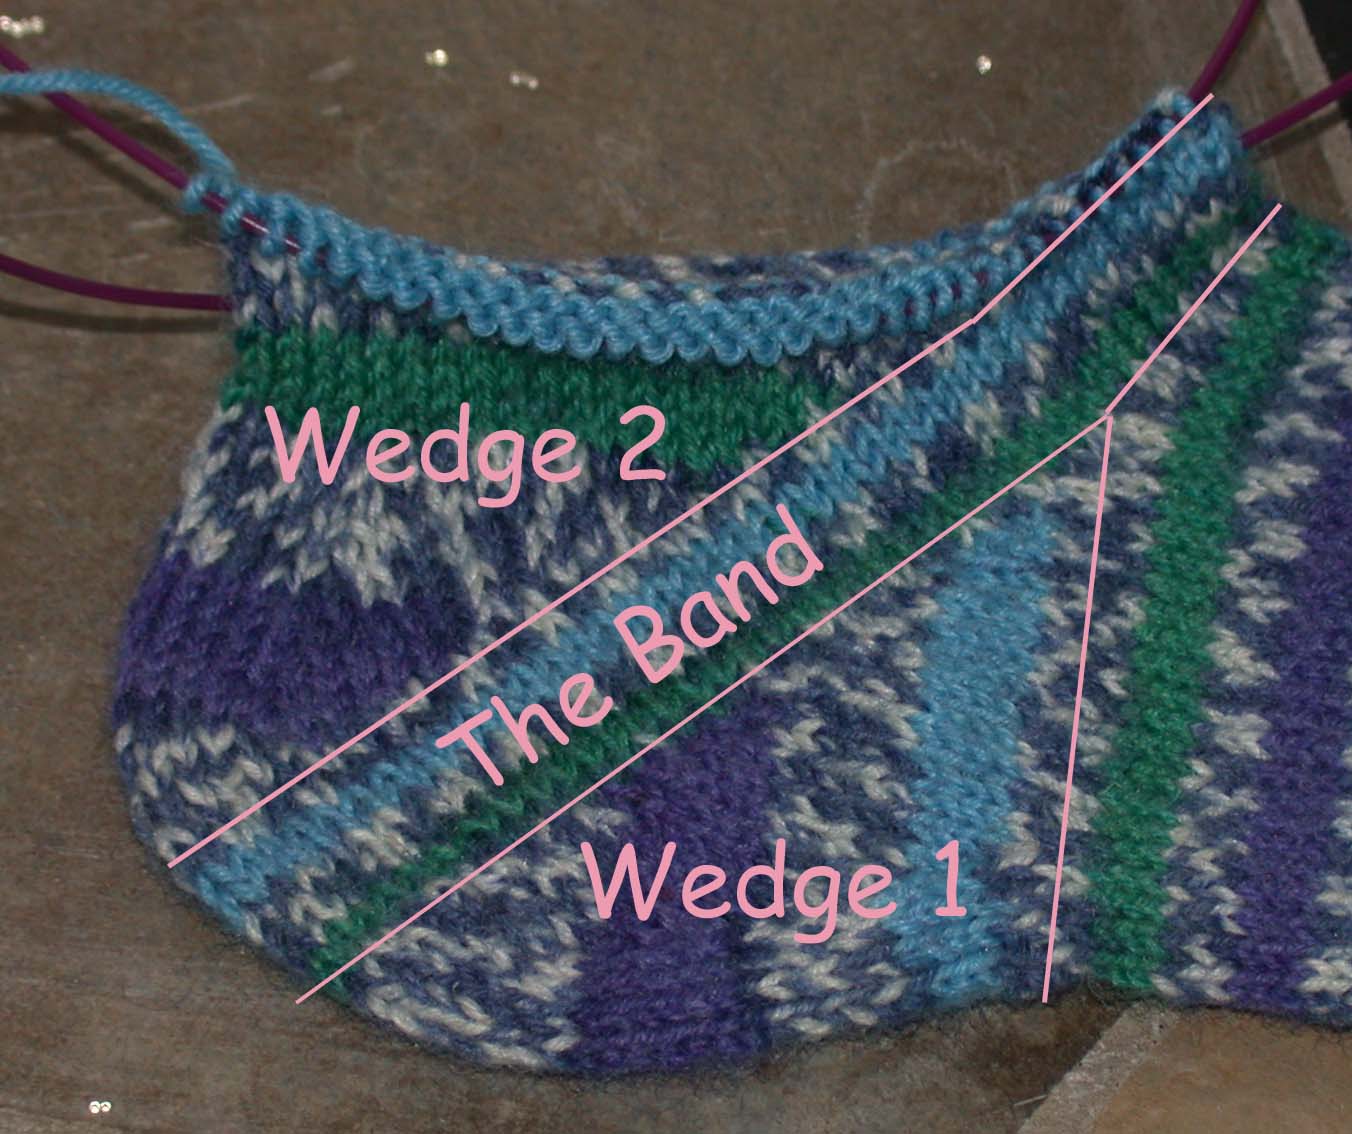
The Banded Expanded Heel Turn – Part 4

WEDGE 2

Wedge 2 is the reverse of Wedge 1. Start working in rows again.

Knit to the first increase marker you come to. Turn, slip and purl back to the opposite increase marker. Turn.

Now you will work longer and longer short rows, each time working two stitches beyond the previous turning point.  On each row, you will need to work each slipped stitch together with the stitch below it as you come to it. This means that you will need to do a purlside “Thanks, Ma!” stitch on the purl rows as follows:

When you come to a slipped stitch, slip it temporarily (purlwise) onto the right hand needle. Use the left needle tip to raise the lower stitch up onto the right needle, with its right leg forward. (Again, in a normal stitch mount.) Place both of these stitches back on the left needle, still mounted normally, and purl them together.

When Wedge 2 is about half an inch deep at the back of the heel, you can begin decreasing the extra stitches away. This is another perfect fit opportunity. If your leg circumference is larger or smaller than your foot circumference, you can decrease more or fewer stitches than you originally increased, to arrive at just the size you need.

  • If you decide to decrease off the same number of stitches, you should try to start decreasing about the same distance from the band as the increases stopped.  If in doubt, wait to start decreasing.
  • If you will be decreasing off fewer stitches, you can wait until Wedge 2 is deeper.
  • If you want to decrease more, don’t start decreasing before you have worked at least half an inch, but continue decreasing for longer, until you have the right number of stitches.  If you still have more stitches to decrease once you begin working in rounds, you can also decide to decrease in a more gradual fashion, say every third round or every fourth round, for a gentler curve. It’s entirely your decision!

So, continue working short rows that grow 2 stitches longer, decreasing one stitch before and after the marked-off center heel stitches on each right side row.  Whenever you have the right total number of stitches, stop decreasing. Whenever you reach the point where you turn from the wrong side to the right side at the place where you marked the start of the instep stitches, begin working in rounds again.

Work an inch or so of plain stockinette rounds if you are working toe-up, before beginning your leg and cuff pattern. Finish sock as desired.

If you are knitting top-down, continue in stockinette to complete the foot and toe as desired.

socks 0731

The Banded Expanded Heel Turn – Part 3

THE BAND

Note:  As you work the band, leave all your markers in place. You’ll need them later.

You have completed Wedge 1 and you are ready to work in the round on the right side.  Make note of how the stitches clump together in pairs.  The stitch closest to the back of the heel in each pair is a normal stitch.  Its partner is a stitch you slipped after turning. Knit up to the first slipped stitch. You will now knit that stitch together with the stitch below it. The easiest way to do this is to use your right needle tip to raise the lower stitch onto the left needle, with the right leg forward.  (In other words, in a normal stitch mount.) Then knit those two stitches together.  Continue all the way around in this fashion, knitting each slipped stitch together with the stitch below. (This is the “Thanks, Ma!” stitch in Cat Bordhi’s terminology.)

Now continue working rounds of stockinette until the band is the width you desire, somewhere between half an inch and one inch. If you can try on the sock, you want the band to nestle nicely right into the bend at the top of your foot. No need to overthink it.  You should stop at the center back of the heel.

Easy-peasy! Ready for another wedge?

The Banded Expanded Heel Turn – Part 2

You have worked your sock – either toe-up or top-down – until you have reached the point where your ankle just starts to bend at the top of your foot.  You have figured out how many stitches you will need to go around your heel comfortably.  Now let’s knit a heel turn!

(Customization note: If you have a lot of stitches to increase, you may want to start the heel increases up to an inch BEFORE you get to this point to make a more gradual transition.  Jump ahead to see where to mark for the increases, and start working them in pairs gradually, say every third round or every 4th round.  When you reach the heel turn point, start working them every other row as described below.)

The Banded Expanded Short Row Heel consists of three distinct sections: Wedge 1, The Band, and Wedge 2. Work the sections in this order regardless of whether you are working toe-up or top-down.

sock heel 1

  • The instructions are given for a stockinette heel. If you are working in another pattern stitch, substitute your own pattern stitches wherever these instructions say to knit or purl.
  • I follow Cat Bordhi’s method of handling short rows in  Cat’s Sweet Tomato Heel Socks by turning, slipping the first stitch, and subsequently working a “Thanks, Ma!” stitch on the way back. Any short row method will work as well, including wrap-and-turn followed by working the wrap together with the stitch.
  • Use markers as you see fit throughout.

WEDGE 1

You will now begin working in rows.

Beginning at the center back of the heel, knit one third of your total stitches. (If you began your increases early, this will be one third of your original number of stitches, plus any increases you have worked.) Turn.

Slip the first stitch purlwise with yarn in front.  Purl back on those stitches, then continue to purl the next one third of your total stitches, still with wrong side facing.  One third of your total stitches will remain unworked at the front of the sock.

Turn. Slip the first stitch purlwise with yarn in back. Counting this stitch, knit until you have worked an even number of stitches and are a generous half inch from the center back.  Increase one stitch. Place marker.  Continue working, placing another marker the same distance from the center back.  Increase one stitch and knit until you are two stitches from the place you turned previously. Turn, slip the first stitch as before, and purl back, stopping two stitches before you turned previously.

Continue in this way, increasing before and after the marked off center heel section on each right side row, until the total number of stitches (including the ones held for the front) equals the number of stitches you need for your heel band.

Now continue to work short rows without increasing, stopping and turning two stitches shorter each time and slipping all first stitches, until you find yourself turning to the right side at the same point as your increase marker. Knit to the center back of heel. You are ready to work The Band.

The Banded Expanded Heel Turn – Part 1

This post assumes that you have a passing familiarity with how to knit socks, or can find elsewhere how to cast on and work a sock from the top down or the toe up.  Regardless of the direction you start, you will reach a point in the middle where the thing has to bend. And for this we need to do a heel turn.

The secret to getting a perfect fit on any foot shape with the Banded Expanded Heel is to take the diagonal ankle measurement.  Place a tape measure around the heel and ankle as indicated by the pink line in the illustration.  The top of the line is the exact middle of the point where your foot bends if you flex it as much as you can.  Record the measurement you get.

foot

While you are looking at your flexed foot, you will notice a wider area where wrinkles of skin form in the bend.  The “band” part of this heel will be about the same width as the wrinkled bend, somewhere between half an inch and an inch.  It’s not real fussy.  The important thing to understand is that the “band” will be centered over that area (that is, centered over the pink line).  So let’s say you have decided to work a band that is one inch wide. That means if you are knitting your sock from the top down, you will need to start your heel when you are half an inch above your personal pink line. If you are knitting toe up, you will start the heel when you are about half an inch below your own pink line. Either way it should be just about where the bendy wrinkles start forming.  (So sorry for using such technical terms.)

  • If you are working your sock top-down, work your cuff and leg patterning as desired, then work about an inch of stockinette to bring you to the point where your ankle starts to bend.
  • If you are working toe-up, work the foot of your sock until it comes up to the point where the ankle starts to bend.

Now for a wee bit of math.

You need to know how many stitches per inch you are knitting. The sock you have knit up to this point is your perfect swatch. PREFERABLY you want to know your stitch gauge when the sock is worn (i.e. stretched). You could  try on what you have and measure from there, or you could measure around the right part of your foot or leg and divide the number of stitches in your sock by that measurement.  (Personally I find math the easier solution.)  You may find, for example, that you are knitting at 9 stitches per inch, but it stretches to only 8 stitches per inch when worn.  Use the stretched figure you come up with.

Multiply your stretched stitch gauge by the diagonal ankle measurement you took earlier.  This will tell you the number of stitches you need to have in the band around your ankle.  Chances are it’s more than the number of stitches already on your needle.  Maybe a LOT more. (I’d be tempted to say if your diagonal ankle measurement is less than your foot or leg measurement, you’ve got more problems than I can solve, but honestly, I don’t have enough experience to be sure.) You might want to subtract a few of those stitches off your total just for luck, since a too loose sock heel is worse than a slightly snug one. You will also want to make sure you are working with an even number, so round down if necessary. Don’t worry too much about the “right” answer. Remember, before you found this post you were probably going to do a heel turn that didn’t increase ANY stitches, so use your best knitterly judgement and make note of the number of stitches you decide on.

Introducing the Banded Expanded Short Row Heel

I like to have a plain vanilla pair of socks on my needles as a ready-to-carry project.  Toe up.  Judy’s Magic Cast On.  2-at-a-time Magic Loop.  Fit as you go.  Tubular bind off.  Boom!

My latest go-to heel has been Cat Bordhi’s Sweet Tomato Heel — smooth, easy to remember and execute, no gaps or weak spots. What’s not to love!  But because this heel is very rounded, without modification it may be too snug on those with a high instep or prominent heel.  My latest pair of socks in progress was intended for someone with just this problem  trait, so I postponed a final decision on the heel as I knit up the foot (-er, feet).

Inspiration works in mysterious ways!  I awoke one morning with a bad case of vertigo, the room spinning around and around me.   As I waited for the appropriate medication to kick in, I braced myself upright in a chair as rigidly as possible to help the swirling to settle down, which is how I came to be staring at the side of my ankle for forty-five minutes.  And without consciously thinking about knitting or sock heels, I realized somewhere along the way that I had figured out just what I needed to do to make a heel that fits perfectly.

My Banded Expanded Short Row Heel starts just like the first wedge of a Sweet Tomato Heel, but adds pairs of increases along the bottom of the foot, thus expanding the heel the exact amount needed.  Then several rounds are worked even to create a diagonal band around the heel where the foot bends.  After that, ever longer short rows are worked to make a wedge that is the reverse of the first (just like any traditional short row heel), while decreasing off the stitches which were added previously.

I now have a new go-to heel!  (And you can, too, as soon as I get the instructions written up.  Stay tuned….)

socks 0731

Enter your email address to follow this blog and receive notifications of new posts by email.

Join 19 other subscribers
%d bloggers like this: