Cheating and the Dark Side of Knitting

My fingers are currently flying to finish the Cabled Poncho by Norah Gaughan from Vogue Knitting, a project I impulsively but with very good reason chose to make for a coworker and which I foolishly but for very good reasons chose to make in black.  For those who aren’t already a step ahead of me on this, both the fact that I am working in a nubbly black yarn and the fact that it is a Norah Gaughan pattern means I need a strategy – a plan – a way of cheating – if I hope to complete this otherwise easy project with my sanity intact.

Since Norah Gaughan tends to bend knitting design in every possible direction [Awesome!], her patterns can usually be counted on to have a challenge, unusual twist or obstacle of some kind to overcome.  In this case it is the need to keep track of an eight-row cable pattern that has its first cable cross on the fifth row while simultaneously performing a pair of central increases on three out of every four rows beginning on row three.  Apparently I am not the only one who found the instructions in the magazine to be sub-optimal, judging from the fact that Vogue chose to include an attempt at clarification in the Errata for that issue.  Figuring that there had to be some rhyme or reason to what was going on, I chose to take matters into my own hands and sketch out visually what happens on each row.  I discovered this fairly simple eight-row repeated sequence:

[Odd-numbered rows are RS and even rows are WS, + is my symbol for a row with increases, and X is my symbol for a row with cable-crosses.]

8
7 +
6 +
5 + X
4
3 +
2 + (except first time)
1 + (except first time)

Whew! Doesn’t it make a whole lot more sense when you see how it lines up?

The next challenge to overcome is working with a yarn that doesn’t let me read my stitches easily.  If I want to make any kind of reliable progress I need a strategy for keeping track of which of these eight rows I am on. This is what I came up with:

Blackstone 006   Blackstone 009

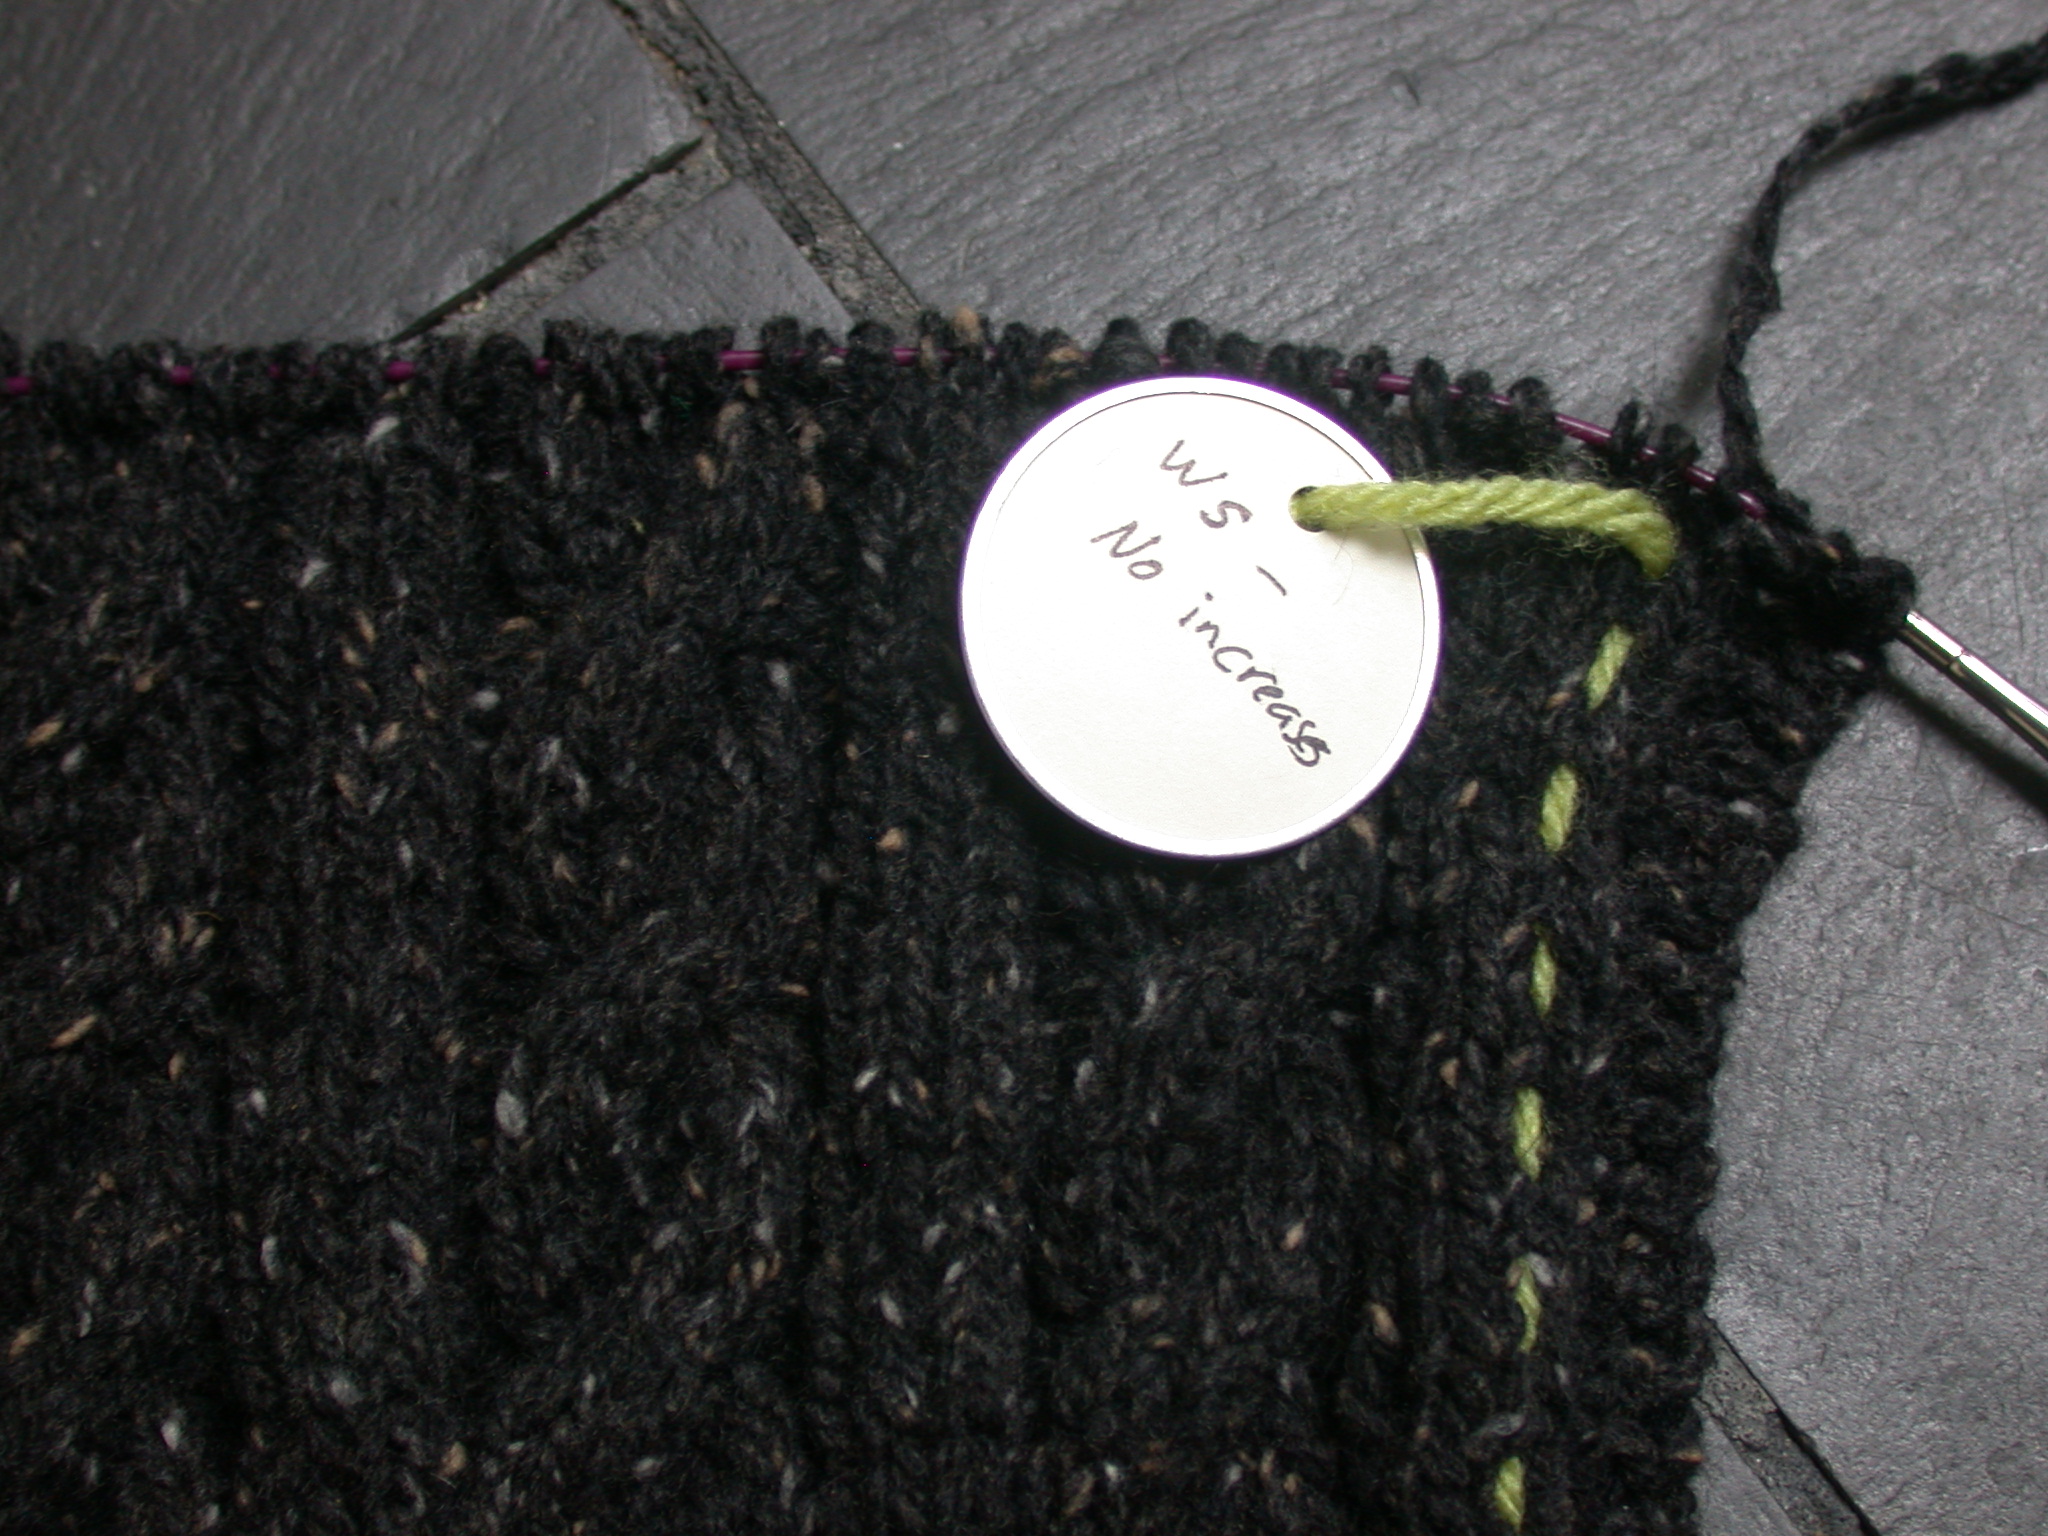
I took a length of brightly contrasting yarn, about 8-10″, and loosely wrapped it around one of the stitches in the first cable-crossing row.  I flip this yarn to the opposite side each time I begin a Right Side row.  As a result, each green stitch or blank space between them represents two rows.  I can pull the yarn up further as I need to.  As I work every fourth row, the green yarn will be hanging on the Wrong Side.  I tagged it to help me remember that whenever the tag is on the Wrong Side and I am working a Wrong Side row, I should NOT work any increases.  It also turned out that the tag is on the Right Side when it is time to work a Right Side cable-crossing row, so I noted this on the tag as well.  (The tag is also on the Right Side midway between cable-cross rows, but it is easy enough to look at the cables and tell by eye whether it is time to cross or if I am only half way there.)

I thought I might actually work a project with no changes this time, but I decided to stop increasing several rows sooner than the pattern calls for in order to prevent the poncho from becoming too long for my petite colleague.  I will continue to knit as many rows as the pattern calls for before dividing for the neck, but without the increases at the top it will pull in to create a bit of shaping for the shoulder.  I hope this will turn out to be a nice feature.  I made this decision because otherwise the “sleeve” edges would fall too short and I only wanted to make it shorter at the bottom hem. (If I had planned on making it shorter ahead of time, I would have just cast on fewer stitches to begin with.) I might also make the neck opening ever so slightly smaller and I am considering modifying the collar so that it does not stand up quite so much.  But all in all, I am working this beautiful pattern as intended and full steam ahead so that my friend can stop shivering as soon as possible.  Since I took the time to figure out a good way to cheat, I can knit away without slowing down to think!

Managing a Knitting Project – Cheat!

I get the impression from the classes I teach that a lot of knitters think that, with the pattern open in front of them and yarn and needles in hand, a garment should appear stitch-by-stitch aided and abetted only by the steady transfer of information through the eyes. If only it were that simple! But the wailing that eventually sets in proves otherwise. I lost my concentration and can’t remember if I just purled or knitted! I put it down and don’t remember what row I’m on. Is this the side I’m supposed to do an SSK or a K2Tog? What do they mean AT THE SAME TIME?!?!

The fact is that for projects more complex than a basic scarf, following a pattern requires a strategy. Working a knitting pattern is not like reading a book, where you proceed word-by-word and line-by-line from beginning to end. The best patterns provide resources beyond the row-by-row stitch directions, including photographs and schematics. There are bold headings for each separate garment section which give you an indication of how the garment will be constructed. Any unique terms or stitch patterns will be defined somewhere. You do not get knitting bonus points for attempting to work a pattern while ignoring these aids.

Once you have used all the clues provided to get at least a partial sense of what you will be trying to accomplish, it can often be useful for you to come up with some aids of your own. If it seems like cheating, then fine! Cheat without shame! Anything you can do to reduce frustration and wasted energy and the likelihood of mistakes so you can focus on the joy of creating something beautiful has my blessing.

Stitch markers of various sorts have often been used in knitting. They are a well-established form of cheating which can free you from some of the burden of having to keep track of where you are. Sometimes patterns will tell you when to place markers, slip them and remove them, but I encourage you to look for your own opportunities to use markers to make your job easier. Mark transitions between borders and main pattern sections. Place markers between each repetition of a cable or lace motif to help you keep everything lined up right. Place a removable marker into the end of a key row (say a cable cross row or the beginning of a pattern repeat) to help you keep your place as you go. You can also use a removable marker to mark the right or wrong side of a piece, if there is any chance of confusion. (Be sure to insert the marker through two stitches, to make sure it STAYS on the side it is supposed to be marking. If you put the marker around one stitch, it can swing to the other side.)

knitting 283

Cheating aids can be plain or fancy!

Some of my favorite knitting aids don’t come from my local yarn store, but from the office supply store. Sticky notes are great to use to keep your place in a written pattern or chart, not only to keep track of where you are but to help guide your eye in reading for less stress and greater efficiency. If a particular set of directions isn’t clear to you, you can write them in your own words on a sticky note and stick it onto the pattern. But my very favorite trick is to use price tags, key tags or cut-up hole-punched bits of index cards to tag my project with reminders at crucial places.

Let’s say you are working a pattern where you are decreasing every so-many rows on the armhole edge while decreasing at a different rate at the neckline….while working in a pattern that has cable crosses every x-number of rows. Write each different shaping instruction on a little tag and pin it with a removable marker to the appropriate section of the project. That way, when you get to the neck edge, your little reminder will tell you exactly what you are supposed to do there. Your tag on the armhole edge will tell you what to do at that side. And in between, your tag telling you to cable every 8 rows (or whatever) will keep your stitch pattern on track, especially if you think to move the marker each time you cable to keep track of where your last cross was. Another example I have used tags for was in making socks when I was first getting the hang of heel shaping. I put “k2 ssk” on one tag and “k2tog k2” on another and hung these on the appropriate sides of the gusset area. Each time I came to these markers I knew just what to do, without having to think about it (until eventually I could do it without having to think about it).

Sometimes I photocopy smaller stitch charts and “laminate” them with clear packing tape.  By pinning them as tags to my project, I don’t have to keep looking away from my work to see what I need to do next. This was especially useful when I worked on Oblique from Knitty, where each row is broken up into several sections each with different lace stitch designs. I pinned the appropriate stitch chart to each section so I could work without distraction.

I don’t know about you but I want to enjoy the process of knitting. I want it to be challenging, yes, but also relaxing. And productive! Ripping out (while sometimes unavoidable) is not an efficient or pleasant use of my time. Anything I can do with materials at hand to help keep myself on track with less effort, I will do. And you should, too!

I CHEAT AT KNITTING! WILL YOU JOIN ME?

Kitchener Stitch Tutorial

Today’s post is brought to you by the letter K
and by the prepositions IN and OUT.

I definitely still need to work on my production quality, not to mention my timing and delivery. But if there are ten minutes of your life that you could spend either watching paint dry or learning how to graft two knitted edges together invisibly, I highly recommend watching this video.

Video

Kitchener Stitch or Grafting – Beyond the Fear

In Knitting Without Tears, Elizabeth Zimmerman claimed that grafting or Kitchener Stitch did not count as a seam but rather magic. But almost everything I’ve ever read about how to work the Kitchener Stitch (even by EZ herself) irritates me. Why? Because they typically describe this amazingly elegant and simple concept in such complex terms with so many steps that a lot of knitters get intimidated by it and avoid it like The Plague. And those who do use it often need to keep a reference book on their lap while they do. (Some sellers of knitting notions have even apparently discovered there is a market for laminated Kitchener instruction cards and mnemonic pendants of various sorts.)

If you do not shy away from grafting but need the security of a reference tool, you still qualify as a knitting hero in my book. That was me, before I had my Aha! moment. However, the truth is that grafting is a lot easier to “see” than it is to describe in words, and once you can see it, you can do it. Independently. Consistently. Flawlessly. And even in pattern!

I am convinced that Kitchener’s problem (the stitch, I mean, not Mr. Kitchener himself) began with the fact that knitters got stuck in describing anything having to do with yarn, stitches and needles in knitting terms. Insert needle into first stitch on back needle as if to knit. Leave stitch on… But hey, people! When you are grafting, that thing in your working hand is a SEWING needle. And how does a sewing needle work? You poke the tip into a fabric, then bring the tip out of the fabric again. In, out. Two words. IN. OUT. The little section of thread left behind between those two holes is called a stitch. Let’s make that our third word: STITCH.

The essence of Kitchener Stitch is that you make a stitch into one edge to be joined, then cross over the gap and make a stitch into the other edge. You continue alternating in this fashion, drawing the edges together in the process. The only thing you need to clarify and visualize first is what counts as IN and what counts as OUT as you are making each STITCH.

Today I am only going to talk about stockinette grafting. If you never graft in pattern your whole knitting life, you will be ~oh-kay~. But the thought of any otherwise competent knitter being afraid to graft in stockinette makes me very sad. And potentially leaves a lot of open sock toes.

Hopefully you have come to understand that when you insert your knitting needle tip as if to knit, you are inserting it into the loop from the front (the surface closest to you) to the back (the surface away from you). When you insert your needle tip purlwise, you are inserting it from the back to the front. To work a basic Kitchener stitch, you go IN the last stitch you previously came out of on that side, and OUT the next stitch. (You pass through the loop of each knitting stitch twice to complete it. Once you have worked the second pass, you can move that loop off of your knitting needle.) The key to knowing which direction is IN and which is OUT comes from recognizing that the STITCH left behind is a purl bump. You want that purl bump to be left on the side of the knitted fabric that has all the other little purl bumps on it – the inside or wrong side.

So insert your needle in one stitch and out the other, and before you pull it through, notice whether it is going to leave a stitch on the knit side or the purl side. Easy to correct if you got it wrong, but before long you will do it instinctively.

The only further hitch is with the very first loop on each needle and the very last, because they don’t have a “partner” next to them. My solution is to pretend they do. Pretend there is an invisible loop before the first loop. Go IN the invisible loop and OUT the first real loop. At the end, pretend there is still another loop. Go IN the real loop and OUT the invisible loop. You’ll get it right every time.

IN and OUT to make a stitch in the loops on the back needle. IN and OUT to make a stitch in the loops on the front needle. No need for a cheat sheet to remember that!

(As I said at first, grafting is harder to describe than to visualize. Since I want to help you “see” the process, I will be posting a video tutorial.)

Moth is a 4-Letter Word

Guess what I’ve been doing today! FINALLY getting around to dealing with a m0+# attack on the shadow-knit King Tut wallhanging I made as a gift awhile back. The infested creation was first mummy-wrapped in a plastic trash bag and quarantined in my unheated mud room for many weeks, which at this time of year is almost as good as a freezer. (I have learned that freezing does not actually kill moth eggs, at least not all of them, but it does at least make them go dormant to ward off further damage.) Before I go further into the subject of moth extermination, let me satisfy your curiosity about shadow knitting and my King Tut. Here he is in a Photoshopped portrait I just made while he is recovering from the steam treatment I gave him this morning.
tut skewed enhanced
The editing was needed in order to apply perspective, or in this case remove perspective to make the image rectangular. Shadow knit images are only viewable from a vantage point that is low or to the side, making displaying photos tricky. This is because shadow knitting consists of narrow stripes of alternating colors, which are worked to create garter ridges where that color is to be visible, or stockinette valleys where that color is to be hidden. When viewed at a shallow angle, one sees the “mountaintops” of the garter ridges and not the “valleys” of the contrasting color.  It is fairly easy to do and straightforward to add simple shapes and rippling color effects to a project. But hi-res images on a large scale, like this?

Yes, it’s as crazy-making to knit as it sounds, especially because the step which determines whether a ridge or a valley is created is performed on the WRONG side of the piece, where you can’t see the image emerging at any angle.  Which – if you know me – means you will understand why I just HAD to knit it. But even if you don’t know me you will understand why I wasn’t particularly thrilled when it started getting moth-eaten.

So, how to evict the little beasties…..? The best tip I have heard is to put all your woolen items in a black trash bag and store them in your car parked in the sun on a summer’s day. Hard-boiled moth eggs, anyone? Sounds easy to do especially if you have a lot of things to de-moth. Regular shaking and brushing of your woolens helps dislodge the eggs as well. But it’s not summer and I want to get this guy taken care of. So I laid him out on a towel on my kitchen counter and closely inspected him, using an old soft tooth brush to whisk off any suspected areas. Then I used my hand-held steamer to go over him thoroughly with nice hot shots of steam, which also serves to reblock him where he had started to sag. (Wish that worked on me!)

As soon as I can dig up the remainders of the yarn I used (a feat of archaeology in itself!), I will repair the little holes and he will be ready to return to his place of honor.

Previous Older Entries

Enter your email address to follow this blog and receive notifications of new posts by email.

Join 19 other subscribers
%d bloggers like this: